Embroidery Stitches
Welcome to TOFT's directory of the embroidery stitches used to add detail to our crochet figurine range. Here you will find a description of each technique with an accompanying video tutorial that covers all embroidery stitches used in our embroidered plates and figurines collection. If you have any further questions, please get in touch with our Customer Care team at [email protected].
NOTE: TOFT uses British English crochet terms in all of our patterns: for example, ‘double crochet’ (dc) is the same as the American English ‘single crochet’ (sc).

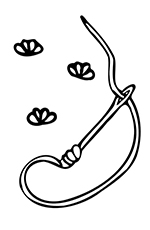
Daisy Stitch
- Put the needle into the fabric where you wish the bottom of the stitch to be, and bring the needle tip out where you want the petal to end. Do not pull the needle out of the fabric at this point.
- Wrap the yarn around the tip of the needle and pull needle through to form a loop.
- Secure into position by sewing back in just the other side of the loop.
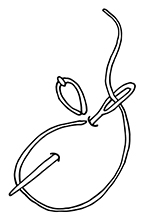
French Knot
- With yarn threaded, bring the needle through the fabric from underneath and pull through.
- Wrap the yarn around the needle 4 times. You can vary the amount of wraps to create different sized knots if desired.
- Insert the needle back into the fabric and pull down to create the knot.

Whipped Back Stitch
- Create a line of back stitching as follows: Put the needle into the fabric and out where you want the stitch to end, then sew back into the fabric where you want the stitch to start. Continue to work in the same way, bringing the needle up to where you want the stitch to end, and back into the end of the previous stitch to create a solid line of stitches.
- Sew underneath each of the stitches just worked, always working in the same direction to create a twist.
Running Stitch
Bring the needle up through the fabric and then sew back into the fabric where you want the stitch to end. Continue in the same way spacing the stitches out evenly until you reach the end of your line.
Long Stitch
Oversew long stitches in the direction of your choice. This is useful for filling in large areas or creating lines of any length on a design.


